Steps for the Immediate Provisional Implant Crown in the Aesthetic Zone
Guide to Success
Introduction
Preservation of the mucosal marginal tissue and papilla around implant restorations is critical to the esthetic success of an implant. Especially in the anterior esthetic zone, preventing gingival recession is of utmost importance in order to avoid the creation of black triangles or uneven gingival zenith levels as a result of papilla or mid-facial recession, respectively(3).
A recent 12-month post operative Randomized Controlled Trial concluded that a fixed implant provisional with a concave emergence profile shows greater stability of mucosal marginal tissue as compared to a convex emergence profile(2).
Figure 1. Pictorial representation of results of the randomized controlled trial. (By Siegenthaler et al., in the Journal of Clinical Periodontology, 2022.)
The Peri-Implant Mucosa
This ties into the rationale behind a platform switch abutment where the narrowing diameter acts as an actual physical stop for the soft tissues, allowing the circular collagen fibers to create a tighter seal, promoting minimal resorption of the bone below(1).
Figure 2. The peri-implant mucosa (From the article by Ciurana et al., in the International Journal of Periodontics and Restorative Dentistry, 2016.)
- A fixed implant provisional with a concave emergence profile can contribute significantly to the pink esthetic score of an implant restoration (4).
- If provisionalisation is delayed to second stage surgery, the provisional should be in place for at least 4 weeks.
- Delayed provisionalisation may lead to initial papilla loss which recovers over 1 year.
- Delayed provisionalisation may lead to 2.5 to 3 times more mid-facial recession as compared to the immediate protocol (2).
In this article we will be presenting a simple technique for fabricating a provisional implant crown with a concave emergence profile. For optimal results the provisional should be placed at the immediate stage of implant surgery and stay in place for 4 months(3).
Types of Implant Temporary Abutments
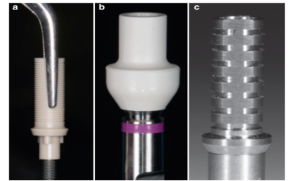
- This technique can be applied to any provisional abutment design. The types of provisional abutment available are depicted in the figure below.
Figure 3. Types of implant temporary abutments
a)., b). PEEK (polyether ether ketone, a thermoplastic polymer) abutments c). Titanium abutment. (Photographs taken from materials available in the clinic).
Steps to Immediate Provisionalization of Implant Crown
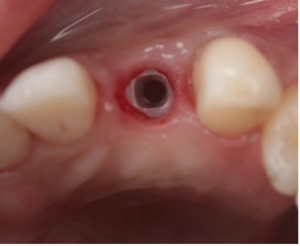
In the example below, a zirconia implant in position #6 will be restored with a PEEK temporary abutment with a concave emergence profile at the second surgery stage (delayed provisionalization)
Figure 4. Zirconia implant in position #6. The tissue looks inflamed and irritated at second stage surgery due to existing fixed temporary abutment.
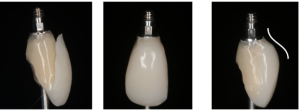
Step 1. Fabricate Preoperative Composite Shell
Fabricated on putty stent made from a diagnostic wax up or preoperative models. A green Almore instrument was used to fabricate the shell for #6.
Figure 5. Preoperative anatomic composite shell for #6 fabricated on stent.
Step 2. Confirm screw access location for temporary abutment intraorally.
A PEEK abutment had to be used in this case since it was a zirconia implant.
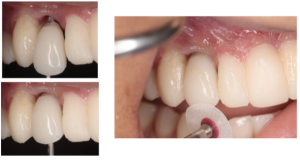
Figure 6. PEEK abutment placed intraorally to confirm screw access location and note blanching of tissue due to convex contours
Step 3. Modify the temporary abutment to remove any divergence or convexity
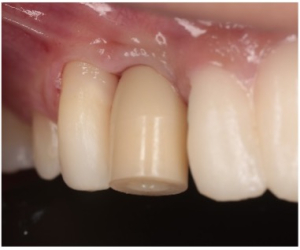
The PEEK abutment was narrowed overall till no tissue blanching was noted, the facial bulge was reduced, and a lingual incline was created. The incisal edge was adjusted to be harmonious to the adjacent dentition. The patient was also receiving veneers from #4-#13 and had veneer temporaries bonded to the adjacent teeth at that time.
Figure 7. Modification of PEEK abutment to create desired contours
Tip
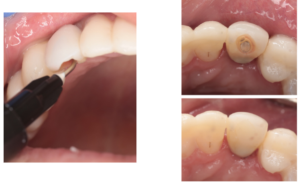
When using a titanium abutment, a flame shaped bur such as a 7408 carbide is used to remove the divergent ring of flare on the abutment. An opaquer such as Kerr A1 opaquer can be used to block out the greyish hue of the abutment.
Step 4. Bond composite shell to temporary abutment
Flowable resin was applied to the intaglio of the shell and polymerized into the correct anatomic position intraorally. More flowable resin was applied intraorally to further stabilize the shell onto the abutment.
Figure 9. Composite shell bonded onto abutment at correct anatomic position with flowable resin
Step 5. Complete fabrication of abutment extra orally
More flowable resin was used to fill all voids. The abutment was finished and polished with frequent intra-oral checks to ensure a biologically driven emergence contour. Ideal contours should lead to no tissue blanching of the peri-implant tissues and have large gingival embrasures. The abutment should have a passive clinical fit with appropriate interdental contacts and facio-lingual placement.
Figure 10. Completed fabrication of temporary abutment extra orally
Step 6. Deliver the temporary abutment
Any occlusal and incisal adjustments were made with an Opti disc. Once all adjustments were completed, the abutment was torqued into place with a force of 35N. If delivering in immediate stage, all occlusal contacts in MIP and excursion need to be relieved and only a 10N force should be used to torque the abutment into place.
Figure 11. Delivery of temporary abutment after necessary adjustments.
Step 7. Seal the screw access hole
TAUB (0.8% Chlorhexidine gel) was used to disinfect the screw access and it was sealed with PTFE tape followed by flowable composite
Figure 12. Screw access hole sealed with PTFE tape and flowable composite
Final Results
Figure 13. Immediate post operative view and 4 week post operative view displaying complete papilla fill
Key Points
- An implant temporary abutment with a concave emergence profile assures maximum preservation of peri-implant mucosa.
- A fixed implant temporary abutment, such as the one described above, can be used to predictably modulate peri-implant tissue to achieve esthetic success.
References
- Ciurana, X. R., Acedo, A. N., Vela, X., Garcia, J. J., & Nevins, M. (2016). Arrangement of Peri-Implant Connective Tissue Fibers Around Platform-Switching Implants with Conical Abutments and its Relationship to the Underlying Bone: A Human Histologic Study. The International Journal of Periodontics and & Restorative Dentistry, 36(4). Quintessence.
- DeRouck, T., Collys, K., Wyn, I., & Cosyn, J. (2009). Immediate provisionalization of immediate single-tooth implants is essential to optimize esthetic treatment outcome. Clin. Oral Impl. Res., 20, 566-570.
- Schoenbaum, T. R. (Ed.). (2018). Implants in the Aesthetic Zone: A Guide for Treatment of the Partially Edentulous Patient. Springer International Publishing.
- Siegenthaler, M., Strauss, F. J., Gamper, F., Hammerle, C. H., Jung. J., R. E., & Thoma, D. S. (2022). Anterior implant restorations with a convex emergence profile increase the frequency of recession: 12-month results of a randomized controlled clinical trial. Journal of Clinical Periodontology, 49, 1145-1157. Wiley. 10.1111/jcpe.13696


